This is a very classic looking centerpiece with a candle in the middle. I like the peach color and the artificial peaches are fun, little surprises in this design.
Saturday, January 31, 2009
Wednesday, January 28, 2009
GIFT MUG
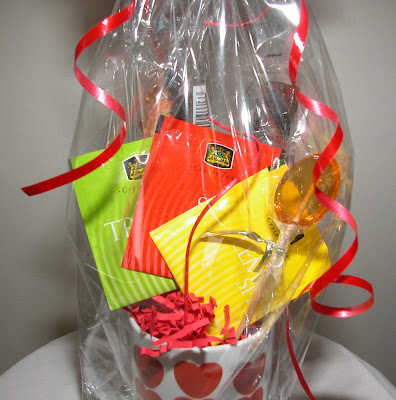
Here is a gift mug you can make yourself easily with just a few ingredients. You need:
A favorite mug
3 tea bags
1 honey teaspoon
2 biscotties
Packaging paper or even old newspaper
Paper Shred in coordinating color
Cellophane roll or small size cellophane bag
Ribbon in coordinating color
Tape
First fill the bottom of the mug with some packaging paper or newspaper. Then cover it with a little bit of colorful paper shred. Secure the two biscotties in the back. Use tape to secure them if needed. Glue dots work perfectly for this job but tape is just fine if you don't have glue dots. Tape the three tea bags together creating a fan. Secure the tea bags to biscotties with another piece of tape. Secure the honey teaspoon to the side inserting it deep into the shred and paper. Then wrap the mug with cellophane and tie it with a nice bow. Cut the top of the cellophane to shorten it or to make it look nicer and give it a fan shape. Your cute little gift is ready for its recipient. Have fun!
Saturday, January 24, 2009
MUG DESIGN
Carnations are beautiful but they are not appreciated as well as other flowers by people. Because people are not buying them, the growers are not producing them as much anymore. In a few years carnations are going to be more expensive than roses because there will be limited number of growers that supply carnations. Maybe then people will give them the value they deserve and they will be popular again.
9 ROSES IN A CUBE VASE
Tuesday, January 20, 2009
MORE RED ROSES
These are the most recent arrangements I made with red roses. Only red roses themselves are enough to make beautiful arrangements. I have not used much of the fillers or greens.
Again my red heart shaped container filled with dozen roses and caged with bear grasses. I love using these pearl pins. It enhances the design so much.
Second picture is the cute mug filled with 7 red roses and wax flowers.
Last pictures are bud vases with one and two red roses. I love the heart shape I had with the bear grasses for the two-rose bud vase.And again I used pearl pins. The single rose in the last picture is sitting on a piled up salal leaves. They actually don't have their stems on. I just piled up the salal leaves and put atop the vase and made a little hole in the middle and then inserted the rose and the bear grasses from the hole. Beautiful charm is accessorizing the simple bud vase.
Wednesday, January 14, 2009
ANOTHER HEART SHAPED PAVE DESIGN
I have quite a few of these heart shaped containers. They are very useful and pretty as containers to organize little stuff but I mostly use them for flowers:) This is not a very good picture. I realized I shouldn't have used red background-obviously-:) for red container and red flowers:) Still, I think it is good enough just to give an idea for the pave design with mixed flowers.
Tuesday, January 13, 2009
ROMANTIC TRIO
RED TULIPS WITH LILY GRASS
Monday, January 12, 2009
SINGLE ROSE BUD VASE
Sunday, January 11, 2009
BEAR WITH ME
Even though I do not care much about the Valentine's Day and I actually don't celebrate it, I love the arrangements for this occasion. They are perfect as everyday love and romance arrangements and to me they are special every day of the year. I made this arrangement while I was decorating our print shop's window and I actually ended up getting a few orders from our customers for the Valentine's Day:) So it is exclusively my design:) Isn't it cute? I designed it in a Valentine's Day designed cereal bowl so after the flowers are spent you have a keepsake bowl to use at breakfast:) I named it "Bear With Me". I will share more Valentine's Day designs with you in the coming few days.
Saturday, January 10, 2009
VEGETATIVE DESIGN
Consumers are becoming more and more influenced by the trends and it seems like "GO GREEN" trend is going to be here for a long time. And it is a good thing:) Everybody should find ways to protect the environment and save energy. It really begins with the individuals. While I try not to waste energy in my house, recycle and try to learn new ways to go green, I thought this "ALL GREEN" design would be perfect to post in my blog. Green trend and flowers go perfect together:)
IKEBANA DESIGN
In history, the Western World floral arrangements were usually massive. On the contrary, the oriental style of arrangements always focused on line, simplicity, symbolism and the careful placement of plant material. The floral arrangement styles of China and Japan have similar phylosophy of nature. Chinese style of arrangements are less stylized and less studied than the Japanese style of arrangements but they greatly influenced the Japanese styles. The word "Ikebana" means giving life to flowers and is generally understood as the Japanese floral art. While there are many kinds of Ikebana style, my arrangement in the picture is an example of a "Moribana Design". Moribana design in itself also has many variations and mine is an upright moribana design. I liked the simplicity of the design but it is also very organized with its subject line, secondary line and the object line. Every piece has a place in the design and follows certain placement rules. Ikebana designs are perfect for you if you like uncluttered, stylish, simple designs.
Wednesday, January 7, 2009
BIEDERMEIER DESIGN
This style originated in Austria and Germany during the beginning of 1800s. It is actually a heavy style of furniture similar to French Empire and English regency designs. A biedermeier floral design is usually compact, rounded or slightly conical in shape and consists of concentric rings of flowers. More square forms are also possible but not very well known. My design in the first picture is an example for the conical shape. The second picture is from a designer I admire, Julie Mulligan at 1800 Flowers. I do not know if this is considered a biedermeier. It is probably more of a pave design but it definitely reminds me of a biedermeier and it looks georgeous. Don't they both look as yummy as a cake:) You can see Julie's original post here. She made a gift out of flowers. She also included the instructions so you can make one for yourself:)
Monday, January 5, 2009
ASYMMETRIC TRIANGLE DESIGN
Even though I like symmetry, I think that asymmetrical designs are more interesting. This all purple, monochromatic design is a good example of it. When they are paired, they can be used to frame paintings, or maybe even a wedding cake on a buffet table. They are often used as ceremony flowers at weddings or as sympathy flowers, too.
Sunday, January 4, 2009
CARNATION TOPIARY
I made this topiary using only pink carnations and some greens. It can be made with roses, alstromeria or any kind of strong stemmed flower that you like. Arrange the flowers hand-tied style in a perfect round shape and then tie right under the heads with a chenille stem or rafia. Insert them altogether in a presoaked foam and cover the rest of the foam with the greens. I also accented the whole design with decorative wire as can be seen in the picture. You can skip the wire and insert a plush bear on one side instead. This would make a perfect gift for anyone.
Saturday, January 3, 2009
Friday, January 2, 2009
MY PAVE ROSES
I love pave design. It is a more compact design that you can use on your nightstand or on a side table. It can be with only one type of flowers or with grouping of many different kinds of flowers. Here I used dark red miniature roses and I arranged them in a wooden box that I was using to keep some kisses chocolates on my table before:) I lined the box with some plastic first and I placed the soaked foam in it. The rest is pretty easy. I just cut the stems very short and I inserted the flowers into the foam all the same height and in rows. I made sure non of the foam was showing covering the edges with some of the leaves. The foam can be covered with moss before the flowers are inserted to make the foam completely invisible. I will have more posts on pave design later.
Subscribe to:
Posts (Atom)
Saturday, January 31, 2009
ALL OCCASIONS CENTERPIECE
Wednesday, January 28, 2009
GIFT MUG
Here is a gift mug you can make yourself easily with just a few ingredients. You need:
A favorite mug
3 tea bags
1 honey teaspoon
2 biscotties
Packaging paper or even old newspaper
Paper Shred in coordinating color
Cellophane roll or small size cellophane bag
Ribbon in coordinating color
Tape
First fill the bottom of the mug with some packaging paper or newspaper. Then cover it with a little bit of colorful paper shred. Secure the two biscotties in the back. Use tape to secure them if needed. Glue dots work perfectly for this job but tape is just fine if you don't have glue dots. Tape the three tea bags together creating a fan. Secure the tea bags to biscotties with another piece of tape. Secure the honey teaspoon to the side inserting it deep into the shred and paper. Then wrap the mug with cellophane and tie it with a nice bow. Cut the top of the cellophane to shorten it or to make it look nicer and give it a fan shape. Your cute little gift is ready for its recipient. Have fun!
A favorite mug
3 tea bags
1 honey teaspoon
2 biscotties
Packaging paper or even old newspaper
Paper Shred in coordinating color
Cellophane roll or small size cellophane bag
Ribbon in coordinating color
Tape
First fill the bottom of the mug with some packaging paper or newspaper. Then cover it with a little bit of colorful paper shred. Secure the two biscotties in the back. Use tape to secure them if needed. Glue dots work perfectly for this job but tape is just fine if you don't have glue dots. Tape the three tea bags together creating a fan. Secure the tea bags to biscotties with another piece of tape. Secure the honey teaspoon to the side inserting it deep into the shred and paper. Then wrap the mug with cellophane and tie it with a nice bow. Cut the top of the cellophane to shorten it or to make it look nicer and give it a fan shape. Your cute little gift is ready for its recipient. Have fun!
Saturday, January 24, 2009
MUG DESIGN
Carnations are beautiful but they are not appreciated as well as other flowers by people. Because people are not buying them, the growers are not producing them as much anymore. In a few years carnations are going to be more expensive than roses because there will be limited number of growers that supply carnations. Maybe then people will give them the value they deserve and they will be popular again.
9 ROSES IN A CUBE VASE
Tuesday, January 20, 2009
MORE RED ROSES
These are the most recent arrangements I made with red roses. Only red roses themselves are enough to make beautiful arrangements. I have not used much of the fillers or greens.
Again my red heart shaped container filled with dozen roses and caged with bear grasses. I love using these pearl pins. It enhances the design so much.
Second picture is the cute mug filled with 7 red roses and wax flowers.
Last pictures are bud vases with one and two red roses. I love the heart shape I had with the bear grasses for the two-rose bud vase.And again I used pearl pins. The single rose in the last picture is sitting on a piled up salal leaves. They actually don't have their stems on. I just piled up the salal leaves and put atop the vase and made a little hole in the middle and then inserted the rose and the bear grasses from the hole. Beautiful charm is accessorizing the simple bud vase.
Wednesday, January 14, 2009
ANOTHER HEART SHAPED PAVE DESIGN
I have quite a few of these heart shaped containers. They are very useful and pretty as containers to organize little stuff but I mostly use them for flowers:) This is not a very good picture. I realized I shouldn't have used red background-obviously-:) for red container and red flowers:) Still, I think it is good enough just to give an idea for the pave design with mixed flowers.
Tuesday, January 13, 2009
ROMANTIC TRIO
RED TULIPS WITH LILY GRASS
Monday, January 12, 2009
SINGLE ROSE BUD VASE
Sunday, January 11, 2009
BEAR WITH ME
Even though I do not care much about the Valentine's Day and I actually don't celebrate it, I love the arrangements for this occasion. They are perfect as everyday love and romance arrangements and to me they are special every day of the year. I made this arrangement while I was decorating our print shop's window and I actually ended up getting a few orders from our customers for the Valentine's Day:) So it is exclusively my design:) Isn't it cute? I designed it in a Valentine's Day designed cereal bowl so after the flowers are spent you have a keepsake bowl to use at breakfast:) I named it "Bear With Me". I will share more Valentine's Day designs with you in the coming few days.
Saturday, January 10, 2009
VEGETATIVE DESIGN
Consumers are becoming more and more influenced by the trends and it seems like "GO GREEN" trend is going to be here for a long time. And it is a good thing:) Everybody should find ways to protect the environment and save energy. It really begins with the individuals. While I try not to waste energy in my house, recycle and try to learn new ways to go green, I thought this "ALL GREEN" design would be perfect to post in my blog. Green trend and flowers go perfect together:)
IKEBANA DESIGN
In history, the Western World floral arrangements were usually massive. On the contrary, the oriental style of arrangements always focused on line, simplicity, symbolism and the careful placement of plant material. The floral arrangement styles of China and Japan have similar phylosophy of nature. Chinese style of arrangements are less stylized and less studied than the Japanese style of arrangements but they greatly influenced the Japanese styles. The word "Ikebana" means giving life to flowers and is generally understood as the Japanese floral art. While there are many kinds of Ikebana style, my arrangement in the picture is an example of a "Moribana Design". Moribana design in itself also has many variations and mine is an upright moribana design. I liked the simplicity of the design but it is also very organized with its subject line, secondary line and the object line. Every piece has a place in the design and follows certain placement rules. Ikebana designs are perfect for you if you like uncluttered, stylish, simple designs.
Wednesday, January 7, 2009
BIEDERMEIER DESIGN
This style originated in Austria and Germany during the beginning of 1800s. It is actually a heavy style of furniture similar to French Empire and English regency designs. A biedermeier floral design is usually compact, rounded or slightly conical in shape and consists of concentric rings of flowers. More square forms are also possible but not very well known. My design in the first picture is an example for the conical shape. The second picture is from a designer I admire, Julie Mulligan at 1800 Flowers. I do not know if this is considered a biedermeier. It is probably more of a pave design but it definitely reminds me of a biedermeier and it looks georgeous. Don't they both look as yummy as a cake:) You can see Julie's original post here. She made a gift out of flowers. She also included the instructions so you can make one for yourself:)
Monday, January 5, 2009
ASYMMETRIC TRIANGLE DESIGN
Even though I like symmetry, I think that asymmetrical designs are more interesting. This all purple, monochromatic design is a good example of it. When they are paired, they can be used to frame paintings, or maybe even a wedding cake on a buffet table. They are often used as ceremony flowers at weddings or as sympathy flowers, too.
Sunday, January 4, 2009
CARNATION TOPIARY
I made this topiary using only pink carnations and some greens. It can be made with roses, alstromeria or any kind of strong stemmed flower that you like. Arrange the flowers hand-tied style in a perfect round shape and then tie right under the heads with a chenille stem or rafia. Insert them altogether in a presoaked foam and cover the rest of the foam with the greens. I also accented the whole design with decorative wire as can be seen in the picture. You can skip the wire and insert a plush bear on one side instead. This would make a perfect gift for anyone.
Saturday, January 3, 2009
Friday, January 2, 2009
MY PAVE ROSES
I love pave design. It is a more compact design that you can use on your nightstand or on a side table. It can be with only one type of flowers or with grouping of many different kinds of flowers. Here I used dark red miniature roses and I arranged them in a wooden box that I was using to keep some kisses chocolates on my table before:) I lined the box with some plastic first and I placed the soaked foam in it. The rest is pretty easy. I just cut the stems very short and I inserted the flowers into the foam all the same height and in rows. I made sure non of the foam was showing covering the edges with some of the leaves. The foam can be covered with moss before the flowers are inserted to make the foam completely invisible. I will have more posts on pave design later.
Subscribe to:
Posts (Atom)